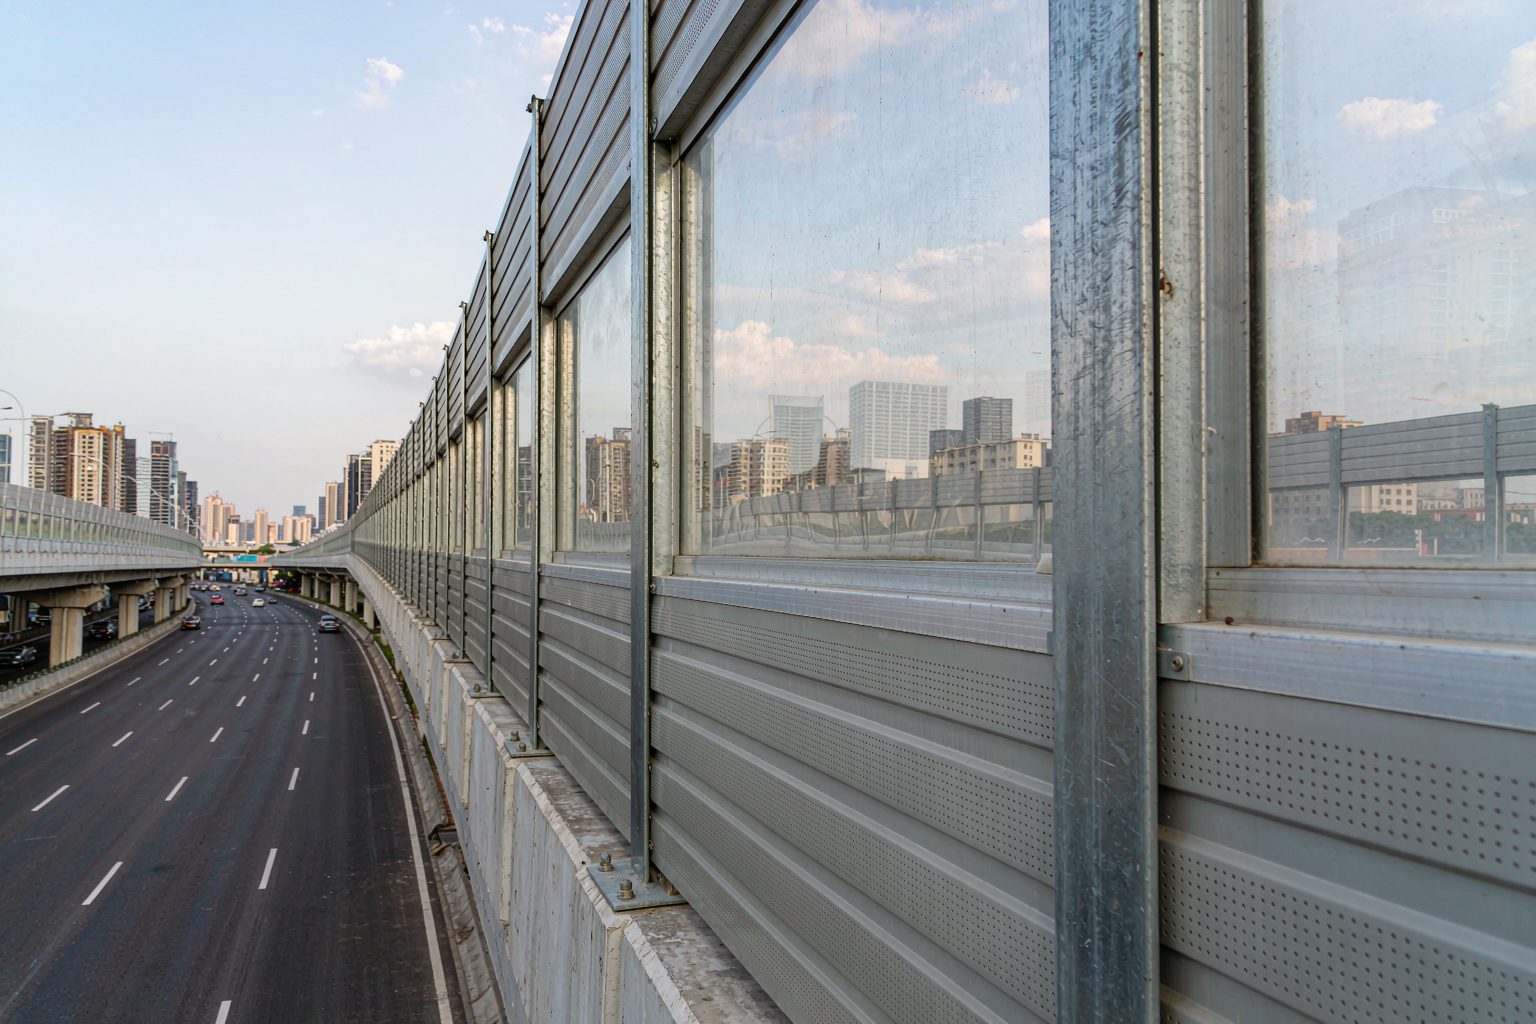
Elevated Bridge Sound Barrier
高架桥隔音屏障 中文页
The Elevated Bridge Sound Barrier is engineered for noise reduction on the sides of urban overpasses, interchange bridges, and ramp bridges. The screen panel is constructed from H-beam steel or aluminum alloy posts paired with lightweight composite sound-absorbing panels and transparent PC acoustic panels. Panel heights range from 2.5 to 5.0 m with a standard bay spacing of 2.0 m, secured via embedded bolts or chemical anchors to the bridge flange or parapet base. Bay joints are provided with expansion gaps and flexible sealing to accommodate bridge deflection. Typical screen weight is 25–45 kg/m²; wind resistance is calculated per site-specific design wind pressure, and all connection details must be reviewed by the bridge design institute. Sound absorption NRC ≥ 0.85, sound reduction index Rw 25–35 dB; typical insertion loss at sensitive receptors alongside the bridge is 5–12 dB(A). Custom-engineered per span survey; common pricing USD 30–65/m². Free structural load and noise-reduction calculations available. Hotline: 18831881133.
Specifications
Values below are the standard configuration. Dimensions, core thickness and coating can be adjusted to your project specification.
About This Product
Elevated Bridge Sound Barriers: Safety Always Comes Before Noise Reduction on Bridges
For residents living alongside elevated bridges, the noise they hear is not the tire sound from the road surface, but a constant "hum" reflected down from the bridge deck—more pronounced on higher floors. This is because the noise source has been elevated into the air, with no embankment or greenery to provide shielding. Installing a barrier along the bridge side is the most direct solution. But a bridge is fundamentally different from an embankment: on an embankment, the barrier weight rests on the ground; on a bridge, it hangs from the structure. The barrier's self-weight and wind load are transferred entirely to the bridge, and connection nodes must penetrate the waterproofing layer. Therefore, the first step in designing elevated bridge sound barriers is not calculating noise reduction—it's calculating structural loads. Hanwei Acoustic's approach is: columns use H-beam steel or aluminum alloy profiles, panels use lightweight aluminum panel composite sound-absorbing boards with PC transparent sections, standard modules are 2m long, fixed via cast-in-place bolts or chemical anchors, and node details are submitted to the bridge design institute for review and approval before production begins. Common barrier heights are 3–4m, with wind resistance calculated based on the design wind pressure at the bridge site. Send us the elevation difference between the deck and the sensitive receptors, span lengths, and railing type, and we will provide both a load analysis and a noise reduction calculation. Phone: 18831881133.
Three Fundamental Differences from Embankment Sections: Wind, Weight, and Connections
Many people treat the bridge section as simply "an embankment barrier lifted higher," and problems almost always arise from these three areas.
First, wind. Bridge decks are open and unsheltered, so design wind pressure values are higher than for embankments. Meanwhile, the barrier itself changes the bridge's lateral windward area—the taller and less permeable the barrier, the greater the lateral force imposed on the bridge. Therefore, on bridges, configurations with high wind permeability are preferred. Small folding angles, ventilation holes, and alternating transparent and metallic sections are all designed to reduce wind load—not for aesthetics.
Second, weight. On embankments, the barrier's self-weight is borne by the ground; on bridges, it is borne by the bridge structure. The box-section composite structure of metal sound-absorbing panels has considerable weight, and all-metal configurations often fail the load check on long-span or aging bridges. That is why bridges extensively use aluminum alloy columns, aluminum面板 panels, and PC transparent panels, reducing self-weight to the 25–45 kg/m² range for structural verification.
Third, connections. You cannot simply embed foundations on a bridge. Connection points must be located on the bridge flange, railing base, or top of the crash wall, using cast-in-place bolts or chemical anchors. There are two risks here: first, drilling through the deck waterproofing layer can cause water infiltration and steel reinforcement corrosion over time; second, insufficient anchor embedment depth can lead to loosening under repeated long-term wind loading. Therefore, node details must be drawn, reviewed, and additional waterproofing layers must be applied.
Panel Selection: Why Aluminum and Transparent Panels Are Preferred on Bridges
In order of priority: reduce weight first, then consider sound insulation, and appearance last.
Aluminum panel composite sound-absorbing boards are approximately 30% lighter than equivalent-gauge galvanized steel products, offer better weather resistance, and are more corrosion-resistant in coastal and de-icing salt environments—at a higher unit price. PC transparent panels are even lighter and preserve driving visibility, but their sound insulation performance is lower than that of composite sound-absorbing panels, so they can only be used in sections—typically no more than 20m per section and no more than one-third of the length of adjacent barrier sections.
All-metal configurations are not unusable, provided the bridge has sufficient load-bearing capacity and the spans are not large. Retrofits on older bridges almost always require a lightweight approach, a question that should be clarified before quotation—otherwise the design may be rejected by the structural engineering team mid-process, delaying the project schedule.
Deformation and Sealing: Expansion Joints, Rainwater, and Temperature Differences
Bridges move—thermal expansion and contraction, deflection under traffic, and pier settlement all transfer displacements to the barrier. If not properly addressed, this can lead to panel joint cracking and sound leakage, water infiltration, or in severe cases, barrier deformation and sheared connection hardware.
Expansion joints must be segmented according to the bridge's expansion movement. The barrier cannot be built as one continuous structure. At regular intervals (typically aligned with the bridge's expansion joint locations), the barrier must be断开, with flexible sealing between modules. The gap width must cover the maximum expansion movement at that location and allow for installation tolerances. This is the step most commonly omitted on bridge projects because it is not visible during acceptance inspection.
Rainwater must have a clear drainage path. The gap between the barrier base and the bridge deck must be sealed to prevent sound leakage, but it cannot trap water. The standard practice is to provide a drainage slope and weep holes at the base, with EPDM sealing strips chosen for weather resistance to avoid hardening and cracking after a few years.
Temperature differences cause different materials to expand at different rates. Aluminum columns, steel panels, and PC panels have different coefficients of thermal expansion. Long barrier runs without expansion gaps and sliding details will buckle under summer sun exposure. Therefore, connection hardware often uses slotted holes to allow minor slide movement.
Bridge-Side Construction: Lifting Windows and Traffic Management
The challenge of bridge-side construction is not installation itself, but "how to deliver materials without bringing traffic to a standstill."
Lifting windows are typically available only at night. Elevated bridges are usually above roads or residential areas. Daytime lifting operations would disrupt traffic and disturb residents. Most projects schedule work between 23:00 and 05:00. The number of spans that can be completed per window is limited, so the schedule must be planned backward from available windows—not by calendar days.
Modules must be pre-assembled on the ground. The working area on the bridge deck is narrow, with no space to stockpile materials. The standard practice is to pre-assemble panels and columns into complete sections on the ground, then lift them整节 into position, performing only alignment and fastening on site.
Edge protection must not be skipped. Bridge-side work constitutes work at height. During barrier installation, temporary edge guarding must be set up on the open side, and all tools and fasteners must be tethered to prevent falling objects from endangering traffic below.
Pitfalls to Avoid: Three Types of Value Engineering Unique to Bridge Installations
1. No node review. The quotation includes only the barrier unit price, with no node details or load calculation reports, and construction proceeds directly from embankment-detailed drawings. Such projects may pass acceptance, but structural risks remain on the bridge, making future liability disputes the most troublesome.
2. Substandard anchor bolts. The load-bearing capacity of chemical anchors varies significantly. Using standard expansion bolts instead of purpose-designed anchors, or drilling to insufficient depth, may go unnoticed initially but will loosen over time under wind vibration.
3. Expansion joints rigidly sealed. Filling the module gaps with rigid materials looks tidy but transfers all of the bridge's movement into internal forces within the barrier itself.
Supply and Construction Process
1. Bridge site survey: Collect span layout, deck width, railing and flange configurations, elevation difference from deck to sensitive receptors, and existing noise levels;
2. Load and noise reduction calculations: Produce barrier self-weight, wind load, and anchor node force analyses for review and sign-off by the bridge design institute;
3. Design and quotation: Finalize barrier height, structural form, panel configuration, and expansion joint locations; produce span-by-span quotation and node details;
4. Production: Column cutting and surface treatment, sound-absorbing panel lamination, transparent panel cutting, with factory outgoing inspection of panel thickness and sound absorption coefficient;
5. Ground pre-assembly: Pre-assemble into modules per span, labeled and transported to site to minimize bridge-side working time;
6. Night lifting: During locked windows, hoist整节 sections into position, align and fasten, seal expansion joints, and apply additional waterproofing layers;
7. Acceptance: Measure barrier verticality and anchor torque, conduct pre- and post-installation noise comparisons at identical receptor points, and hand over all documentation with the delivery.
Elevated Bridge Sound Barrier — Frequently Asked Questions
The questions buyers ask most often about this product before placing an order.
What is the price per square meter for an elevated bridge sound barrier?
Typical pricing ranges from USD 30–65/m², higher than ground-level installations due to three factors: lightweight materials (aluminum posts, aluminum panels, and PC panels carry higher unit costs), anchor connections (require detailed drawings, structural review, and additional waterproofing layers), and on-bridge construction (night-window work, full-section hoisting increase labor and equipment costs). Projects with shorter spans, adequate load capacity, and steel post options will see lower prices. Send us the span, screen height, and parapet type for a same-day per-span quotation. Call 18831881133.
How tall can a sound barrier be installed on a bridge?
Commonly 3–4 m; heights above 5 m are rare. The limitation is structural, not acoustic. Taller screens increase both self-weight and lateral wind load, which may exceed the bridge's load and wind-resistance margin. When sensitive receptors are at upper floors and a 3–4 m screen cannot fully cover the acoustic shadow zone, we recommend using a slight-angle bent or curved design to extend the shadow zone, rather than simply increasing height.
Is approval from the bridge design institute required before installing a sound barrier?
Yes, it is mandatory. The screen's dead load and wind load are ultimately carried by the bridge structure, and anchor points involve both the primary structure and the waterproofing layer. The standard procedure is for us to produce detailed connection drawings and a load calculation report, which must be reviewed and signed off by the original bridge design institute or a qualified inspection agency before production begins. Skipping this step places full liability on the contractor in the event of any issue.
Will the sound barrier affect the bridge's load-bearing capacity or wind resistance?
It will consume part of the existing margin, which is why a proper calculation is essential before installation. We provide the screen self-weight (typically 25–45 kg/m²) and wind loads under various conditions; the bridge design institute then verifies whether the bridge can accommodate the proposed configuration. For older bridges with tight load margins, a lightweight approach is recommended: aluminum alloy posts, aluminum face panels, a higher transparent-panel ratio, and ventilated openings to reduce wind load.
How are screen panels handled at bridge expansion joints?
The screen must be broken at every expansion joint. A continuous solid barrier is not acceptable. Segments are separated at the expansion device locations with a flexible-sealed gap whose width covers the maximum expansion movement and installation tolerance at that point. Filling the gap with rigid material is incorrect—it effectively transfers the bridge's thermal movement into internal forces within the screen panel.
Can a sound barrier be retrofitted onto an already operational elevated bridge?
Yes, but the conditions are more demanding. Operating bridges have tighter load margins and shorter work windows compared to new construction. Lightweight configurations with night-time hoisting are typical, and anchor points are优先 selected at the parapet base rather than the bridge deck to minimize damage to the waterproofing layer. More upfront work is required: structural review, traffic-organization approval, and night-construction permits—all mandatory before work can commence.
Can the sound barrier panels fall off?
When designed and installed to code, this is not a concern. Three anti-fall measures are standard: (1) anchor joints are calculated for wind load and fitted with anti-loosening features—double nuts, spring washers, or dedicated locking fasteners; (2) connections are periodically re-tightened as part of routine bridge inspection and maintenance; (3) an anti-fall wire rope can be added so that even if a single connection fails, the entire panel cannot detach.
How is the acoustic performance verified after installation?
Verification is done by comparing identical-point measurements taken before and after installation: sound pressure level is measured 1 m from the sensitive receptor's window, at the same height and during the same time period (including nighttime). The difference is the actual insertion loss, checked against the noise-reduction target for that road section. Two important notes: (1) comparisons must be made under similar traffic flow conditions, otherwise the data is not meaningful; (2) distinguish the barrier's contribution from other concurrent measures—any noise-reduction surfacing or speed-limit changes implemented at the same time must be factored out during acceptance testing.
Need Elevated Bridge Sound Barrier for Your Project?
Send your drawings, noise data or site photos. Our engineers return an itemized proposal in English — standard configurations within 24 hours, engineered projects in 2 to 3 working days.
Ordering information
- MOQ: one mixed container acceptable for trial orders
- Production: 7–15 days for standard configurations
- Payment: T/T 30% deposit, balance against B/L copy; L/C at sight accepted
- Shipping: FOB Tianjin or CIF to your destination port
- Documentation: material certificates and acoustic test reports included